Showing posts with label frosting. Show all posts

Monday, September 3, 2012

Maple Bacon Cupcakes

maple bacon cupcakes
bacon cupcakes

Bacon!!  Don't think your eyes are deceiving you, those are crispy bits of bacon on top of these cupcakes.  If you've ever "accidentally" gotten maple syrup from your pancakes onto your bacon, and thought you had found a little bit of heaven, then these maple bacon cupcakes have your name on them.

The batter is very simple. Only change I made to the recipe was using maple bacon, which I think helped blend the flavors together nicely without losing the sweet and salty contrast.  The hardest part about this recipe is cooking the bacon.  These are best still slightly warm, enjoyed immediately after frosting.  If you closed your eyes, you might even think you're enjoying a bit of a warm pancake topped with maple bacon. ;]

Maple Bacon Cupcakes
Adapted from The Cupcake Bible, Publications International, Ltd.
Makes 12 cupcakes

  • 1 1/2 cups all-purpose flour
  • 1 3/4 teaspoons baking powder
  • 1/2 cup unsalted butter (room temp.)
  • 3/4 cup sugar
  • 2 eggs
  • 2 tablespoons maple syrup
  • 1/2 cup milk
  • 8-10 slices of maple bacon (cooked crisply, chopped into bits)
Maple Frosting
  • 1/2 cup unsalted butter (room temp.)
  • 3 tablespoons maple syrup
  • 2 tablspoons milk
  • 3 cups powdered sugar
~Preheat the oven to 350 °F.  Prepare muffin tins with cupcake liners.

~In a large bowl, cream together 1/2 cup butter and sugar.  Add eggs and 2 tablespoons maple syrup, and beat until mixed.

~In another bowl, mix flour and baking powder to blend.

~Gradually add your flour mixture to your butter mixture, alternating with the milk.  You should start and end with the flour mixture.  Mix just until incorporated.  Stir in all but 2 tablespoons of your bacon.

~Fill cupcake liners three-fourths full and bake for 18-20 minutes, or until a toothpick inserted into the center comes out clean. 

~Once your cupcakes are done, cool in the pan for 5 minutes, then remove to a wire rack and cool completely.

~For your frosting, beat your 1/2 cup butter, 3 tablespoons of maple syrup, and 2 tablespoons of milk in a large bowl. Slowly add in your powdered sugar, and beat until incorporated and slightly fluffy. 

~Frost your cooled cupcakes, and top with your bacon that you saved earlier.  Now enjoy your maple bacon cupcakes!

Saturday, December 17, 2011

Bailey's Irish Cream Cupcakes (a.k.a. Old Gregg Cupcakes)


If you are a fan of Irish Cream Liqueur, or know someone who is, try these cupcakes! I may be biased because of my love for Bailey's, but I truly enjoyed this recipe.  If you have access to Coole Swan unlike most of us Americans, I can only imagine that making the recipe even better.

If you don't know the Old Gregg Bailey's connection, I highly recommend going to youtube for a moment and searching for him.  It's a particular episode from the "Mighty Boosh" TV series.

Anywho, it was my friend Crystal's birthday and she was going to be visiting from out of town.  As an avid fan of Old Gregg,  I knew I needed to make her Bailey's cupcakes.  I was able to find a recipe online that had the best reviews I could find, and gave it a shot myself.

Next time I will brush the tops of the naked/baked cupcakes with some Bailey's, but as alcohol doesn't last long in my household, I had just enough for the recipe and frosting.

I tweaked the frosting recipe a tad, and what I changed will be in parenthesis.

Bailey's Cupcakes
Adapted from Cupcake Rehab
http://cupcakerehab.com/2010/03/luck-o-the-irish-baileys-cupcakes/
Makes 26-28 cupcakes


  • 2/3 cup unsalted butter, room temp.
  • 2 cups sugar
  • 2 large eggs, room temp.
  • 2 teaspoons vanilla extract
  • 1 1/3 cups Bailey’s (or any other Irish Cream Liqueur)
  • 2/3 cup water
  • 2 tablespoons milk
  • 4 cups all-purpose flour
  • 2 teaspoons baking powder
  • 2 teaspoons salt


~Preheat the oven to 325 °F.  Prepare muffin tins with cupcake liners.

~In a large bowl, cream together butter and sugar until fluffy. Add the eggs and vanilla and beat well.

~In a separate bowl, combine the liqueur, water, milk and mix together. (I did this in a measuring cup to save on dishes)

~In another bowl, thoroughly combine flour, baking powder, and salt.

~Add the flour mixture to the creamed mixture, alternating with the liqueur mixture. Beat on medium speed for approximately 2 minutes. (You should start and end with the flour mixture)

~Fill cupcake liners three-fourths full and bake for 24 minutes, or until a toothpick inserted into the center comes out clean.  (These don't rise too much, so feel free to be a little heavy handed. I've been using an automatic ice-cream scooper and it's made my life easier.)

~Cool in the pan for 5 minutes, then remove to a wire rack and cool completely. I recommend topping these with the frosting mentioned below!

Bailey's Buttercream Frosting


  • 1 stick unsalted butter, room temp.
  • 3 cups powdered sugar (I added a little more because I went heavy on the Bailey's, and because of the addition of vanilla extract that I did)
  • 2 tablespoons (maybe more) Bailey’s
  • (1/4th teaspoon vanilla extract)
  • (Pinch of salt)


~Cream the butter on high speed for approximately 3 minutes.

~Add the Bailey’s and mix thoroughly. Slowly add the powdered sugar until well blended.

~If necessary, add more Bailey’s to thin or more sugar to thicken it to desired texture. (This is the point I tasted the frosting and decided to add a little salt and the vanilla extract.)

~Feel free to brush Bailey's on top of your cupcakes before frosting. Enjoy your soft and creamy beige cupcakes!

(I loved these liners my mom found! Merry Christmas lovelies!)

Tuesday, December 6, 2011

German Chocolate Cake


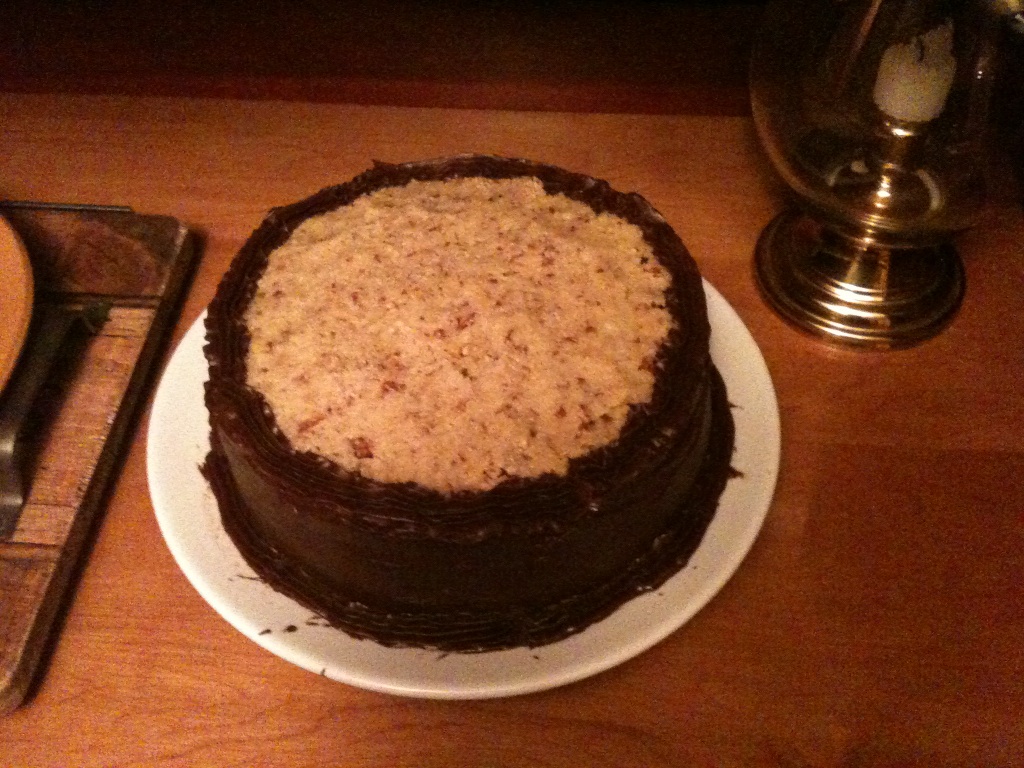
Sorry I didn't get any good pictures!  We were too busy eating and drinking, haha, but this gives you a rough idea.

You're going to be stacking layers, so make sure you use straight edged cake pans.

I had made this before for my dad's birthday, and since my own birthday was Oktoberfest themed, I thought it only appropriate to give this cake another whirl.  The chocolate ganache frosting never thickened up for me the first time, but this time I heated the cream for longer and popped the final product in the fridge for a moment, and it worked beautifully.

This is probably the most involved recipe I've posted about so far, but this is the best German Chocolate Cake I have ever had, so I didn't mind the time it took.  I think using unsweetened coconut makes the filling so much better.  It wasn't as sickeningly sweet as other German Chocolate Cakes I have had.  I'll be sure to make this again and get better pictures!


German Chocolate Cake
Adapted from David Lebovitz:  http://www.davidlebovitz.com/2005/09/german-chocolat-1/
Makes a tall 9-inch cake, about 16 servings

For the cake:

  • 2 ounces bittersweet or semisweet chocolate, chopped
  • 2 ounces unsweetened chocolate, chopped
  • 6 tablespoons water
  • 8 ounces (2 sticks) unsalted butter, room temp.
  • 1 1/2 cups sugar (split into 1 1/4 cup, and 1/4 cup)
  • 4 large eggs, separated
  • 2 cups all purpose flour
  • 1 teaspoon baking powder
  • 1 teaspoon baking soda
  • 1/2 teaspoon salt
  • 1 cup buttermilk, at room temp.
  • 1 teaspoon vanilla extract


~Preheat the oven to 350°F. Butter two 9-inch cake pans, then line the bottoms with rounds of parchment or wax paper.

~Melt both chocolates together with the 6 tablespoons of water. You don't want direct heat, so use either a double-boiler or a microwave. Stir until smooth, then set aside until room temperature.

~In the bowl of an electric mixer, or by hand, beat the butter and 1 1/4 cup of the sugar until light and fluffy, about 5 minutes. Beat in the melted chocolate, then the egg yolks, one at a time.

~Sift together the flour, baking powder, baking soda, and salt.

~Mix in half of the dry ingredients into the creamed butter mixture, then the buttermilk and the vanilla extract, then the rest of the dry ingredients.  In other words, you want to start and end with the dry ingredients.

~In a separate metal or glass bowl, beat the egg whites until they hold soft, droopy peaks. Beat in the 1/4 cup of sugar until stiff. (This takes a while by hand!  Bust out the mixer if you have one.)

~Fold about one-third of the egg whites into the cake batter to lighten it, then fold in the remaining egg whites just until there’s no trace of egg white visible.

~Divide the batter into the 2 prepared cake pans, smooth the tops, and bake for about 45 minutes, until a toothpick inserted into the center comes out clean. (I tested at 40 minutes)

~Cool cake layers completely.

~While the cakes are baking and cooling, make the filling, syrup, and icing.


Pecan/Coconut Filling:
  • 1 cup heavy cream
  • 1 cup sugar
  • 3 large egg yolks
  • 3 ounces butter, cut into small pieces
  • ½ teaspoon salt
  • 1 cup pecans, toasted and finely chopped
  • 1 1/3 cups unsweetened coconut, toasted


~Mix the cream, sugar, and egg yolks in a medium saucepan. Put the 3 ounces butter, salt, toasted coconut, and pecan pieces in a large bowl. (The pecans and coconut shreds that I bought have a toasting recipe on the back of the bag.)

~Heat the cream mixture and cook, stirring constantly and scraping the bottom to make sure nothing burns.  Do this until the mixture begins to thicken and coats the spoon (an instant-read thermometer will read 170°F.)

~Pour the hot custard immediately into the pecan-coconut mixture and stir until the butter is melted. Cool completely to room temperature. (It will thicken.)


Rum Simple Syrup:

  • 1 cup water
  • 3/4 cup sugar
  • 2 tablespoons dark rum


To make the syrup:

~In a small saucepan, heat the sugar and water until the sugar has melted. Remove from heat and stir in the dark rum.  It's that simple!


Chocolate Ganache Icing:
  • 8 ounces bittersweet or semisweet chocolate, chopped
  • 2 tablespoons light corn syrup
  • 1 1/2 ounces unsalted butter
  • 1 cup heavy cream


To make the icing:

~Place the 8 ounces of chopped chocolate in a bowl with the corn syrup and 1 1/2 ounces of butter.

~Heat the cream until it just begins to boil. Remove from heat and pour over the chocolate. Let stand one minute, then stir until smooth. Let sit until room temperature.  (I popped mine in the fridge for a moment. If you do this check often!  It can stiffen up quickly.  No sex jokes please ;])

To assemble the cake:

~Remove the cake layers from the pans and cut both cake layers in half horizontally.  Using a serrated knife is the easiest.

~Set the first cake layer on a cake plate. Brush well with syrup. Spread 3/4 cup of the coconut filling over the cake layer, making sure to reach to the edges. Set another cake layer on top.
(I would divide the filling into 4 sections to ensure each layer gets an even amount.  I found the first time I used too much early on and the top was lacking.)

~Repeat, using the syrup to brush each cake layer, then spreading 3/4 cup of the coconut filling over each layer, including the top.

~Ice the sides with the chocolate icing, then pipe a decorative border of chocolate icing around the top, encircling the coconut topping.

~Last but not least, enjoy all of your hard work!

Devil's Food Baby Shower Cupcakes (It's a boy!)


These are how the cupcakes for my brother's baby shower turned out! The only differences from the test run that I did are I used foil liners, and I topped the cupcakes with white sugar pearls.  That and the quantity of course, since this time I septupled the original recipe which only yielded 12 cupcakes.  I did three batches doubled, and then one the original size.  I got to sample a cupcake from each batch, since 80 cupcakes had been requested, poor me. ;]

I've noticed paper liners pretty much get dominated by any dark batter, so I love foil liners for this purpose.  They also add some elegance since they keep a clean, crisp appearance even after baking.

I go easy on the sugar pearls because I don't want to take away from the frosting at all, but they make a beautiful accent!  That and not everyone wants a slight crunch to their cupcakes, haha, if you've never used them before I suggest tasting one so you know their consistency.  5-8 was a perfect amount for me.  I was told later people at the party were actually asking if they were edible, which I had to smile at, since I've never seen a beaded cupcake, haha, these are the ones I used:


I stuck with the blue food color and violet icing dye to get a baby blue color.  Being a person on the verge of OCD, this means I made a giant batch of frosting to ensure that all of the cupcakes matched in color.  Remember, less is more!  Go easy on the violet.  If you're not familiar with icing dyes, here is an example of what to look for:


I used large foil pans to store these, which were perfect.  They were sturdy and deep enough to keep the cupcakes safe for their car trip.  I kept them in the fridge over night, and arrived a little early at the baby shower so they had plenty of time to get back to room temperature.

I have the recipes in my last post, but here they are again just in case!


Devil's Food Cupcakes 
Adapted from Cupcakes by Shelly Kaldunski
Makes 12 cupcakes

  • 1 cup all-purpose flour
  • 1/4 cup unsweetened cocoa powder
  • 3/4 teaspoon baking soda
  • 1/4 teaspoon salt
  • 1/2 cup sugar
  • 1/2 cup packed light brown sugar
  • 4 tablespoons unsalted butter, room temp.
  • 1 large egg, room temp.
  • 1 teaspoon vanilla extract
  • 1/2 cup lukewarm water
  • 1/4 cup buttermilk

~Preheat oven to 350°F.  Prepare muffin tins with cupcake liners.

~Sift together the flour, cocoa powder, baking soda, and salt in a medium bowl.  I don't normally sift, but cocoa powder always clumps up for me.

~In a large bowl beat together the sugar, brown sugar, and butter until light and fluffy.  Add the egg and vanilla and mix until combined.  

~At this point add about 1/3 of your flour mixture, alternating with the water and buttermilk.  You should start and end this process with the flour mixture.  Beat just until combined.  Spoon your batter into your prepared muffin tins, no less than two-thirds full.

~Pop these in the oven and bake for 18 minutes, or until a toothpick inserted into the center comes out clean.  (Mine needed the full 18 minutes this time around, but I did still check after 16.)

~Cool in the pan for 5 minutes, then remove to a wire rack and cool completely.

~Once cooled, top with frosting and decorations of your choice.  Enjoy and indulge in these chocolate goodies!

Basic Buttercream Frosting

C&H Recipe
Frosts 10-12 cupcakes

  • 1 lb. box powdered sugar
  • 1/4 teaspoon salt
  • 1/4 cup milk
  • 1 teaspoon vanilla extract
  • 1/3 cup butter (2/3 stick), room temp.

~Combine all ingredients together in a large mixing bowl.  I'd recommend an electric mixer to start on this one, scraping the bowl often.  If it seems too stiff to spread or pipe easily, beat in milk a few drops at a time.

~To get the color of mine it took roughly 3-6 drops of blue food coloring, and a small dab of violet icing dye.  Less is more with this, you can always add more later!

Sunday, November 27, 2011

Devil's Food Cupcakes (Baby Shower Test Run)


Can you tell I got a new 1M tip? haha, I had fun piping these!  The more classic swirls, where you start piping on the outside and move in, are in the back.  The rose like swirls are in the front.  First time doing these and I'm really pleased with how they looked.  It's pretty much the reverse, you pipe in the middle for a moment, and then start swirling out.  When you get towards the end release pressure but continue moving the piping bag around.  This prevents you from getting a hard ending point.

Because these are going to be for a baby shower, I went with a buttercream I could tint as opposed to the chocolate glaze that came with the original recipe.  I'll post the buttercream recipe at the end.  I liked this one a lot better than the one I made previously.  Still rich, but not sickeningly so.  Also easier to make in my opinion.

I got the blue color from blue food coloring with a dab of violet icing dye.  The blue food color always seems to have a slight teal tint to it, and the violet cancels this out nicely.  I got this tip from a blue velvet cupcake recipe I will hopefully be baking/posting soon.  Any specialty cooking store, such as Sur La Table, should have a nice selection of icing dyes.

My brother and his girlfriend had asked me to do their baby shower cupcakes, and of course a flavor I had never done was chosen, haha, so I felt required to do a test run to prevent a disaster filled evening the day of.  That and the cupcakes were chosen based on a picture I found, not an actual recipe, so I needed to make sure I could replicate that look as well.  The dark cake I assumed to be Devil's Food Cake, with a light blue buttercream frosting for a nice contrast.

I actually baked two types of Devil's Food Cake Recipes.  I do this whenever I don't have a favorite recipe to fall back on.  However there was a clear winner, so that is the recipe I will be posting.

These turned out very tasty.  Moist and chocolaty like a Devil's Food Cake should be, without being too messy.  I'm hoping they go over well at the baby shower!  I'll be making around 80, so wish me luck.  In the meantime my mom's work will be reaping the benefit of my test run.

Here's to not needing my own baby shower cupcakes for a looooong time. ;]


Devil's Food Cupcakes 
Adapted from Cupcakes by Shelly Kaldunski
Makes 12 cupcakes

  • 1 cup all-purpose flour
  • 1/4 cup unsweetened cocoa powder
  • 3/4 teaspoon baking soda
  • 1/4 teaspoon salt
  • 1/2 cup sugar
  • 1/2 cup packed light brown sugar
  • 4 tablespoons unsalted butter, room temp.
  • 1 large egg, room temp.
  • 1 teaspoon vanilla extract
  • 1/2 cup lukewarm water
  • 1/4 cup buttermilk

~Preheat oven to 350°F.  Prepare muffin tins with cupcake liners.

~Sift together the flour, cocoa powder, baking soda, and salt in a medium bowl.  I don't normally sift, but cocoa powder always clumps up for me.

~In a large bowl beat together the sugar, brown sugar, and butter until light and fluffy.  Add the egg and vanilla and mix until combined.  

~At this point add about 1/3 of your flour mixture, alternating with the water and buttermilk.  You should start and end this process with the flour mixture.  Beat just until combined.  Spoon your batter into your prepared muffin tins, no less than two-thirds full.

~Pop these in the oven and bake for 18 minutes, or until a toothpick inserted into the center comes out clean.  (Mine needed the full 18 minutes this time around, but I did still check after 16.)

~Cool in the pan for 5 minutes, then remove to a wire rack and cool completely.

~Once cooled, top with frosting of your choice.  Enjoy and indulge in these chocolate goodies!

Basic Buttercream Frosting

C&H Recipe
Frosts 10-12 cupcakes

  • 1 lb. box powdered sugar
  • 1/4 teaspoon salt
  • 1/4 cup milk
  • 1 teaspoon vanilla extract
  • 1/3 cup butter (2/3 stick), room temp.

~Combine all ingredients together in a large mixing bowl.  I'd recommend an electric mixer to start on this one, scraping the bowl often.  If it seems too stiff to spread or pipe easily, beat in milk a few drops at a time.

~To get the color of mine it took roughly 3-6 drops of blue food coloring, and a small dab of violet icing dye.  Less is more with this, you can always add more later!